Microsoft Word is the world’s leading word processor and whilst you’re likely to be familiar with it, you may not necessarily be getting the most out of it. Here we’ve shared five easy steps to using Microsoft Word more effectively.
1. Create custom keyboard shortcuts in Word
We don’t know about you but we love a good keyboard shortcut, they just save so much time! The great thing is that in Microsoft Word software, you can actually create your own custom keyboard shortcuts.
Simply click on the Microsoft Office icon and then Word Options. From there, click the Customise tab and a dialogue box will appear. You will then be able to choose a category and select the command, style, font or other item you want to use a keyboard shortcut for. Next, click the ‘Press New Shortcut Key’ text box and type the shortcut into the text box. This will allow Word to check that the key hasn’t already been assigned to another command. Finally, click ‘Assign’ and your new keyboard shortcut will be ready to use!
2. Customise the Quick Access toolbar
Microsoft Office has a tool bar at the top known as the ‘Quick Access Toolbar,’ which makes it easy for you to save your work, as well as carry out actions such as undo and redo. One way you can use Microsoft Word more effectively is by customising this toolbar.
To customise the toolbar, simply click on the Microsoft Office icon in the top left hand corner and click Word Options. Click the ‘Customise’ tab and then simply select the functions you would like adding to the Quick Access toolbar to make it more convenient for you to create and edit your Word documents.
3. Change the destination folder for your Microsoft Word files
Unless you specify otherwise, Microsoft Word will always put new files into your ‘My Documents’ folder. If you prefer to save files into specific folders you have set up for your business so you can keep your hard drive organised, then it’s a good idea to change the destination folder.
One word of caution though – your destination folder might already be correct and saving to your server so that your documents are part of your business back-up. If you do choose to save documents to your PC or Laptop, they’re unlike to be automatically backed-up so do check if you are not sure.
If you are confident in changing this and know the location you wish to use, then simply click on the Save option and find the section marked ‘default file location.’ Next, enter the name of the folder you want to use as the default and click OK.
4. Export to different document types
Saving your Microsoft Word documents in the correct format can help you and your staff or co-workers to work more efficiently. If users can open your document without having to mess around trying to convert it, it will help to save a lot of time and hassle.
 If you are creating documents in Microsoft Word 2013 or 2007, you will find that it saves to its ‘.docx’ native format by default, which some users may not be able to view. The best way to ensure everyone can see your document is by choosing a different save location option. Saving it as a ‘.doc’ will ensure someone with an older version of Word can open and read the file.
The ‘.rtf’ ‘.txt’ formats are also readable across multiple devices; just remember that whilst ‘.rtf’ will retain most of your formatting, ‘.txt’ will strip it completely. You can also easily convert Microsoft Word files to PDF format but you won’t be able to edit the PDF file afterwards.
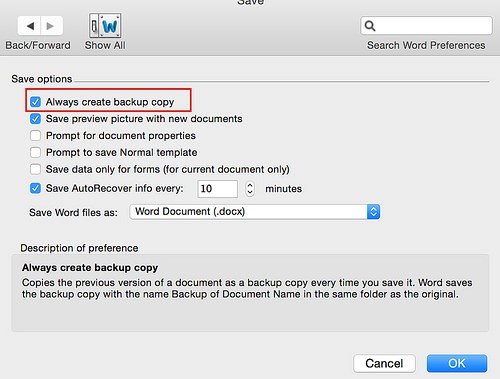
5. Turn back-up copy on
Older versions of Microsoft Word had what was known as ‘Fast Saves’ but these were eliminated in Word 2007, as the larger file sizes were at a higher risk of corruption. However, newer versions of Word are still able to automatically create back-ups of your files, it’s just not programmed to do so by default.
To turn on backups, simply go to Save As, click on options and tick the box that says ‘always create a back-up copy.’ This will create a back-up of the previous version of your file, as well as the most recently saved version. It’s a great feature to make use of, as it will protect you against little mistakes, like accidentally deleting half your work!
Conclusion
We hope this quick guide has helped you learn a few new tips when using Microsoft Word. If you’d like any more advice please contact us, we already produce a number of similar user based articles and guides and hold them within our Grant McGregor Knowledge Base (KB). It is all part of us helping you to get the most out of your computer systems
Image sources: https://farm8.staticflickr.com/7308/12197550343_8944076b43.jpg and https://farm9.staticflickr.com/8598/16084092853_5f0999435d.jpg


